


I spent the last two weeks putting together an ExAI-first deep learning library written in C++. I know most developers may find that old or outdated. Most would say C++ isn't as mainstream as languages like Python or Rust. But I think that's a bit of a shame. C++ is one of the first languages I learned back in high school, and while its syntax and methodology can be a lot to deal with, it is still very powerful. So this small gesture is my attempt at making the language mainstream again in the machine learning and AI sector, especially in ExAI.

The library is called Pulsatrix, and it's open source under the MIT license: github.com/Joshuaweg/pulsatrix.
Why not just use the Python tools? Because in most of them, explainability is bolted on after the fact. Captum's LRP, for example, only ships rules for a handful of layers: Linear, convolutions, pooling, BatchNorm, ReLU, Dropout and Tanh. Hand it an LSTM or an attention layer and it raises an error asking you to set a rule yourself, which means writing your own hooks and backward passes and hoping they're correct. Zennit is more flexible, but new layer types still mean writing custom rules. LRP for transformers and Mamba exists, but in separate research codebases. In Pulsatrix it's the other way around: explainability is part of what it means to be a layer. If a module doesn't define how relevance flows through it, it doesn't compile.
And C++ never really left. PyTorch and TensorFlow both run on C++ cores. The explanations just never made it down there with them. If you deploy a model somewhere Python can't follow (embedded devices, latency-critical services, regulated systems that need a small, auditable binary), the explanations usually get left behind. Pulsatrix keeps them in the same code as the model.
Size matters here too. A default GPU install of PyTorch is about 3 GB of downloads before it's even unpacked, and on my AMD workstation the installed PyTorch + ROCm stack takes up 5.4 GB. Even the CPU-only build is around 200 MB to download. The whole Pulsatrix library compiles to a 2.8 MB static library, and the recipe that trains and explains the MNIST model below compiles to a roughly 160 KB executable that needs nothing but the C++ standard library. To be fair, PyTorch does vastly more, and a GPU build of Pulsatrix still needs the CUDA or ROCm runtime like everything else. But if you need a model and its explanations to fit somewhere small, that difference is hard to ignore.
Building it with an agent that knows C++
This was a huge amount of work. Not only was I building a deep learning library, I was building it so that its models could be completely inspectable using various ExAI techniques. On top of that, I didn't want to stop at simple perceptrons or deep neural network patterns. I also wanted to provide a collection of established deep learning architectures (RNNs, CNNs, Transformers, etc.), out-of-the-box reinforcement learning workflows, and the ability to create neuro-symbolic architectures. So I used Claude Code, a coding agent, to help me develop the library, and I paired it with another useful tool, aDNA, to create an agent with focused C++ engineering context.
aDNA ("agentic DNA") is an open-source, MIT-licensed project on GitHub that makes it quick to set up agents with good context management. It's built around Claude Code, but everything it produces is plain Markdown plus AGENTS.md files, so other coding agents can read it too. You clone the repo and start your agent inside it. The agent automatically reads a set of orientation files that explain how aDNA works, and from there you just start describing what you want: what the agent should know, how it should complete tasks, and who is involved (humans or agent personas). aDNA then builds a new project whose knowledge is organized into a context graph of Markdown files, sorted into who/, what/ and how/ and linked together by relevance and relation. As the project grows, the agent only loads the context the current task needs.
I used aDNA to construct a C++ engineer. I gave it context on the C++ language, Doxygen standards for documentation, and Google Test for writing tests. I also had aDNA provide context on object-oriented and functional programming, since both styles were going to be used in the library. Then I had the agent build a development workflow, so that whenever it worked on a task, any code it added would meet the task's specs. The flow is: review the upcoming task, decompose it into technical requirements, write the tests for those requirements, write the code, and run the tests. On a failure, review the error and test again. On a pass, move on to the next task. It's a standard pattern for sure, but because it's written into the agent's context, the agent follows it on every task without being reminded.
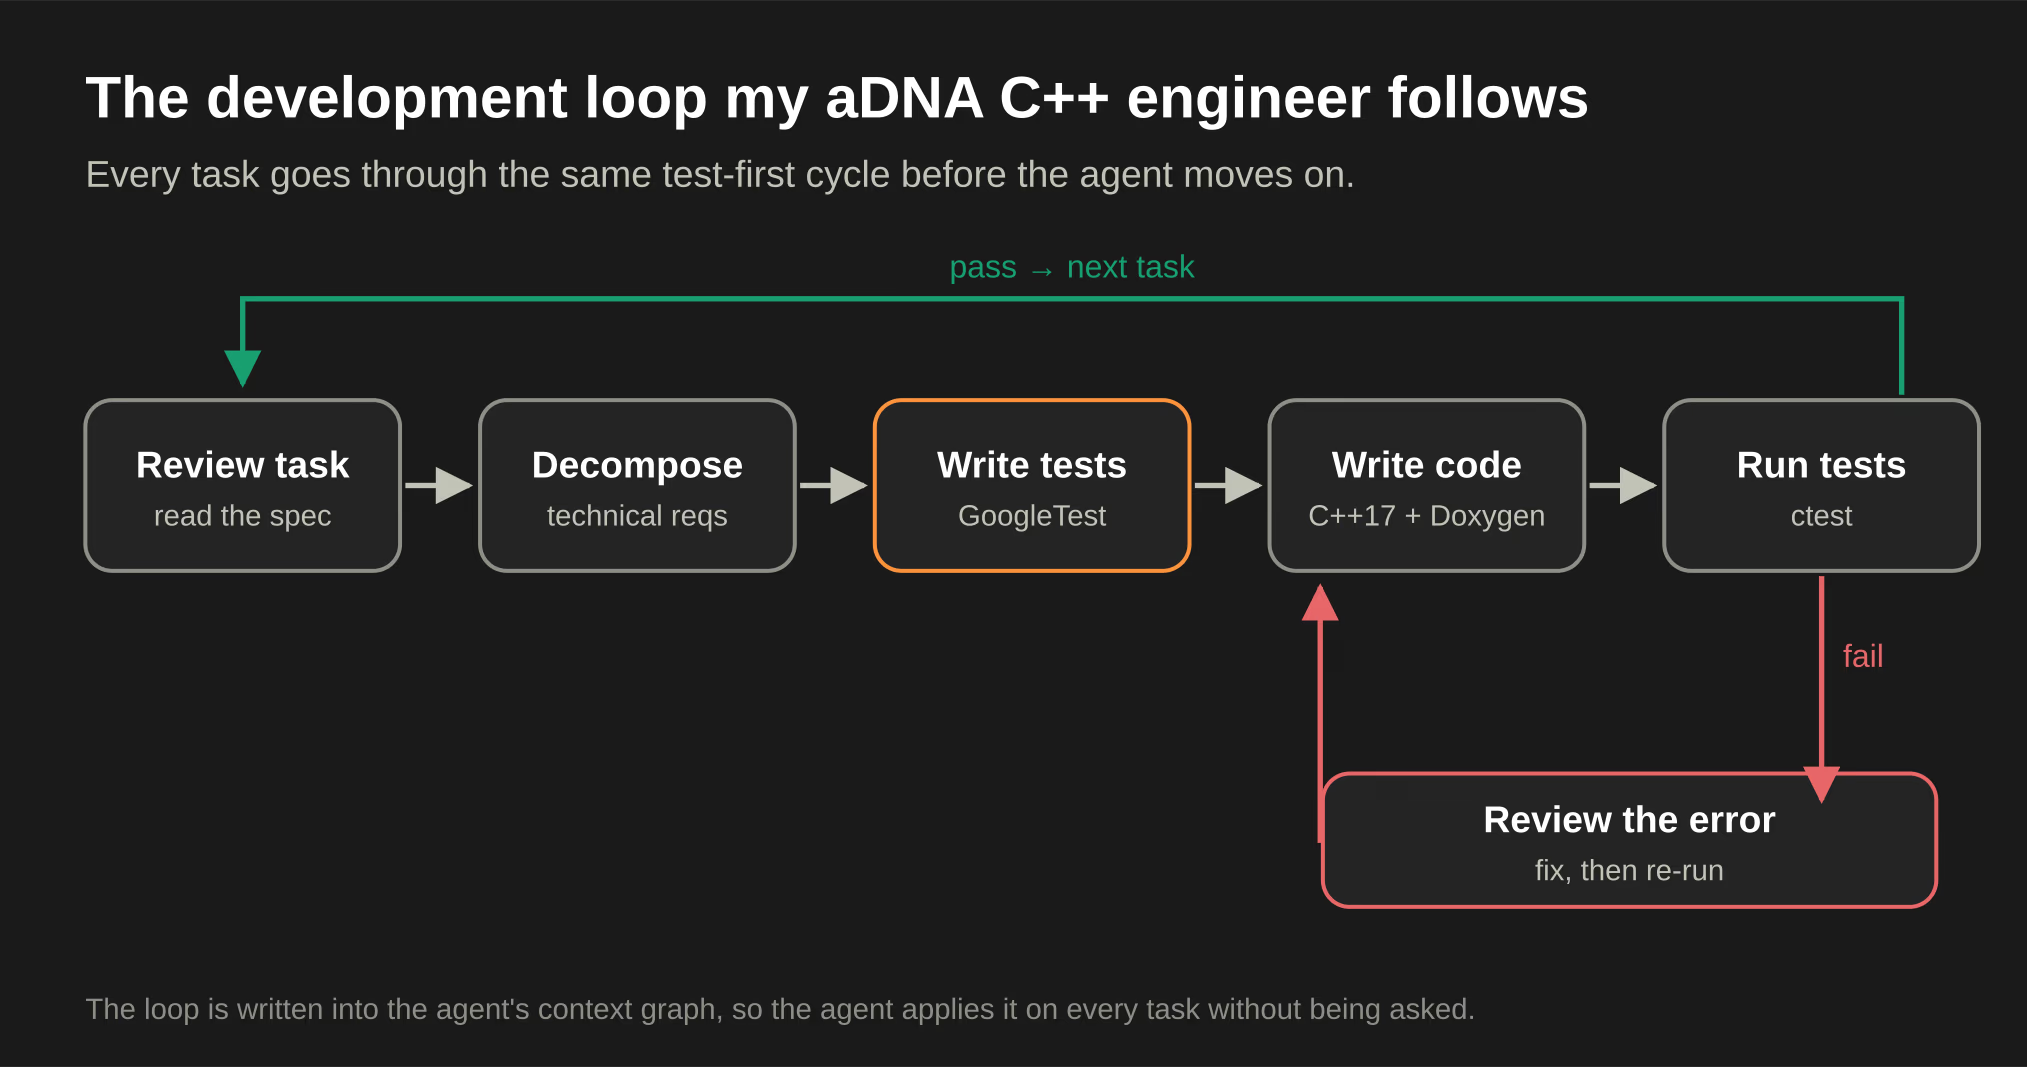
With my aDNA agent designed, it was time to get started on the library. These were the objectives:
- A C++ deep learning library built ExAI-first: every layer needs to be inspectable and return activations, gradients and other relevant scores.
- Support for GPU acceleration with either CUDA or HIP.
- A catalog of modules (layers) for designing many different architectures.
- Model-agnostic post-hoc ExAI techniques (SHAP, LIME, PDP, etc.).
- LRP compatibility for every module.
- Gradient-based post-hoc techniques for deep models (Integrated Gradients, Grad-CAM, etc.).
- Patterns for reinforcement learning.
- Data loading and data transforms for different types of data.
- Training loops.
- Mechanistic interpretability tools.
- Neuro-symbolic tools.
I submitted these instructions and the agent got to work.
What's inside
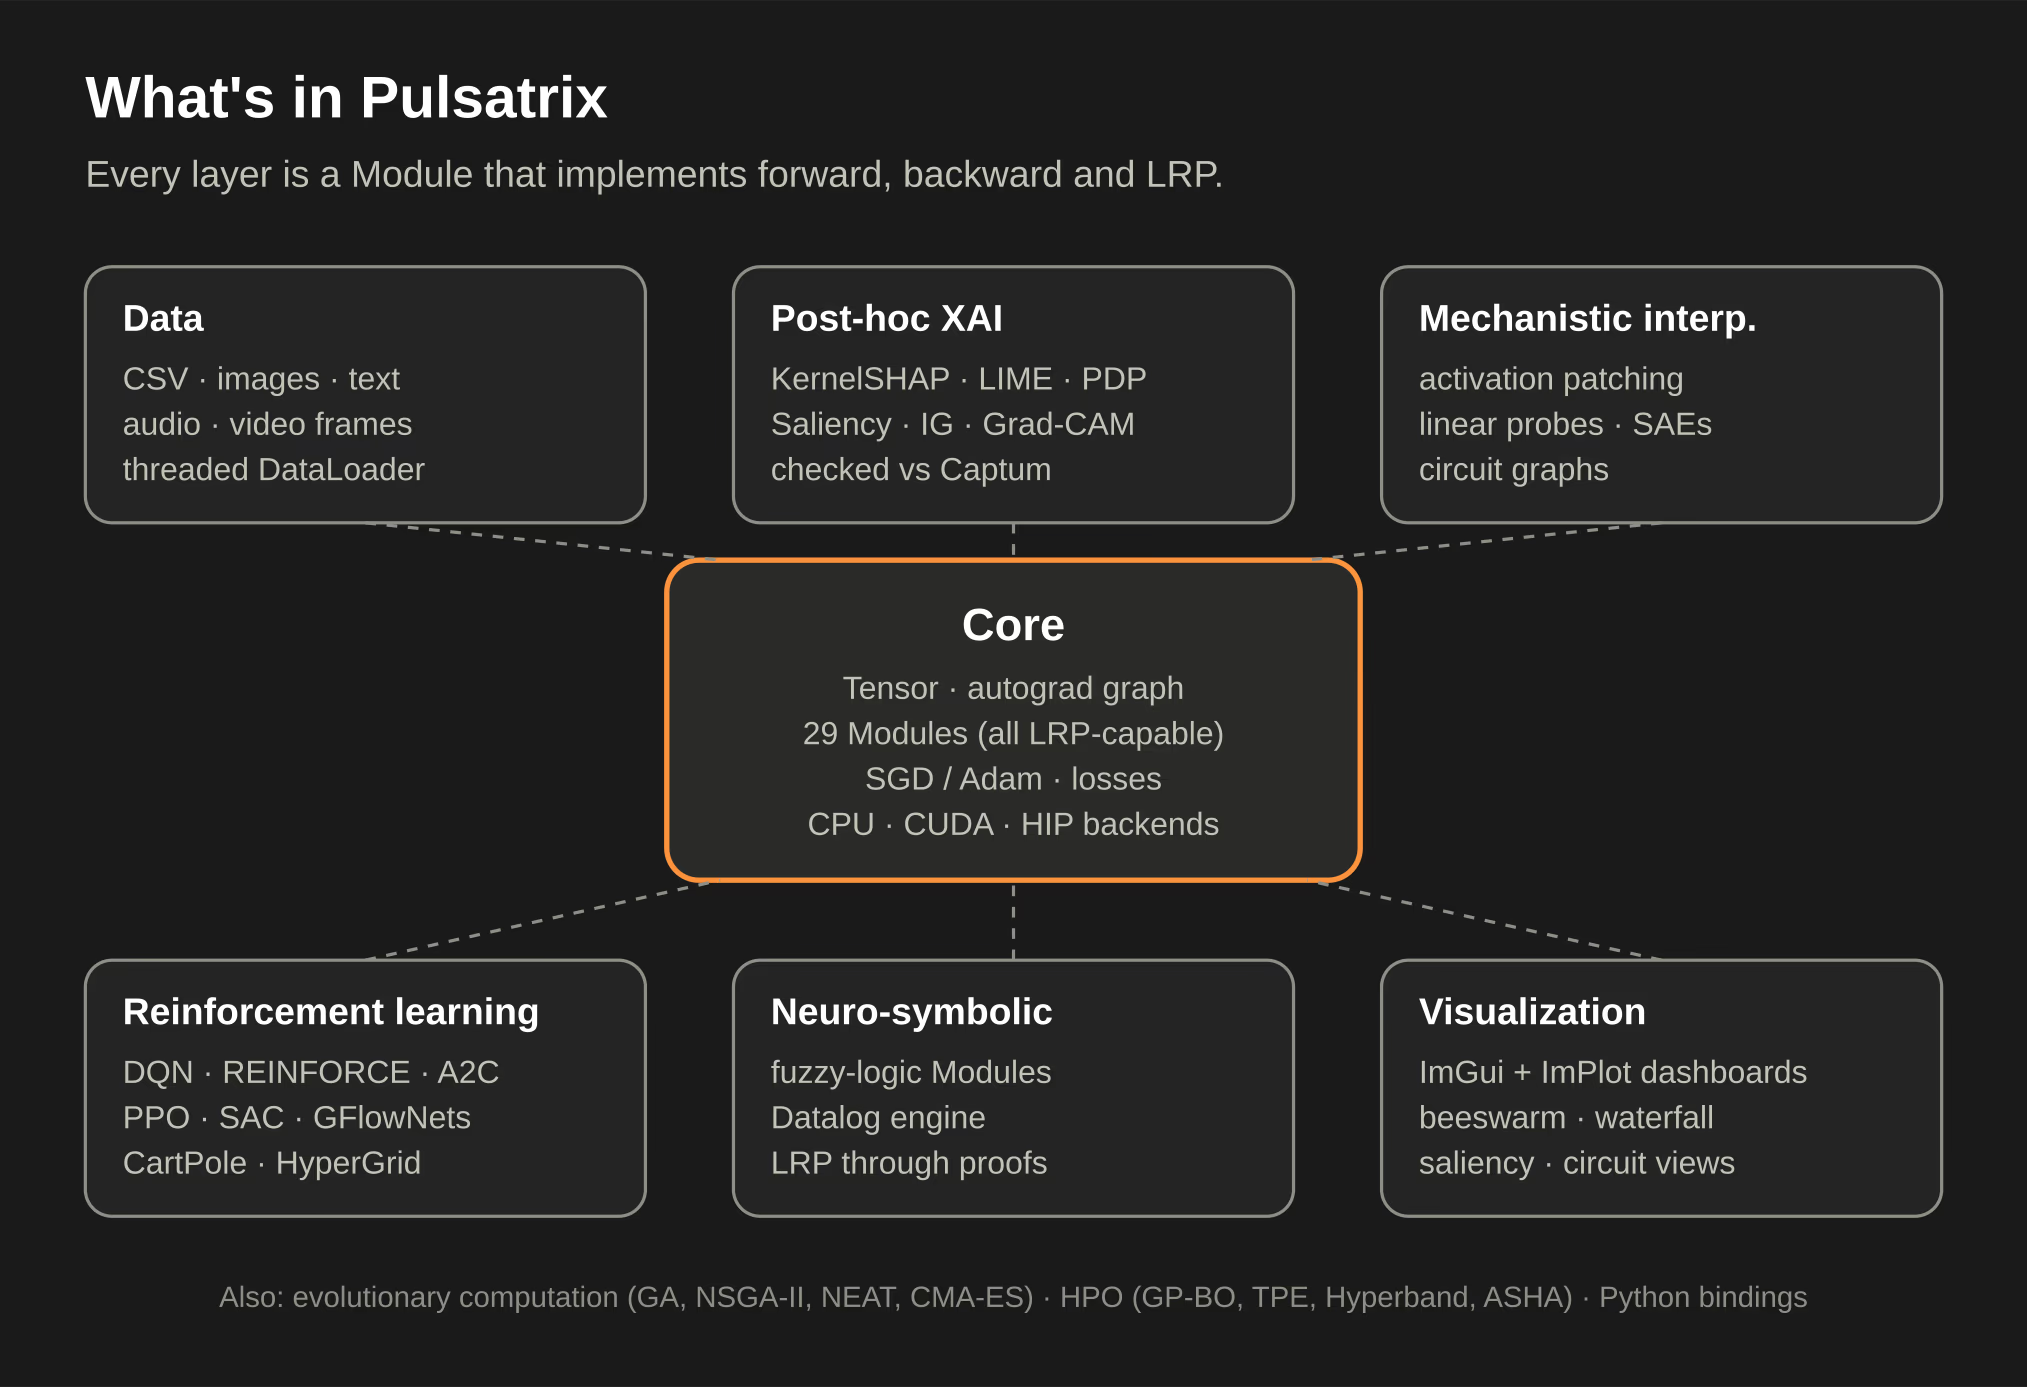
Core
At the center is a Tensor type with an autograd computation graph, SGD and Adam optimizers, and the usual losses (MSE, cross-entropy, BCE-with-logits, KL divergence). Math runs through a DeviceBackend interface with CPU, CUDA and HIP implementations, and the CUDA and HIP backends share a single kernel source. Every module runs its forward pass, backward pass and LRP on the GPU, and so does the reinforcement learning stack. I've run the full test suite on both an NVIDIA (CUDA) machine and my AMD (ROCm) workstation, and it passes on both.
There are 29 modules to build with:
- Basics: Linear, Conv2D, ReLU, Softmax, Flatten, Dropout, Embedding, Sequential, Residual
- Normalization and pooling: LayerNorm, RMSNorm, GroupNorm, BatchNorm, MaxPool2D, AvgPool2D
- Sequence models: RNN, LSTM, GRU
- Attention and beyond: MultiHeadAttention, RoPE, SwiGLU, TransformerBlock, plus the newer Mamba, RetNet and RWKV
- Fuzzy logic: Conjunction, Disjunction, Negation, Aggregator (more on these below)
There are also building blocks for generative models: VAE reparameterization, diffusion noise schedules and timestep embeddings, and an evolutionary GAN (E-GAN) setup.
Data loading
Pulsatrix has a multithreaded DataLoader with samplers and collate functions, plus datasets and transforms for several kinds of data: CSV and tabular data, image folders, text (tokenizer and vocabulary), WAV audio, and directories of video frames. There's also an MNIST loader for the classic first experiment.
LRP in every layer
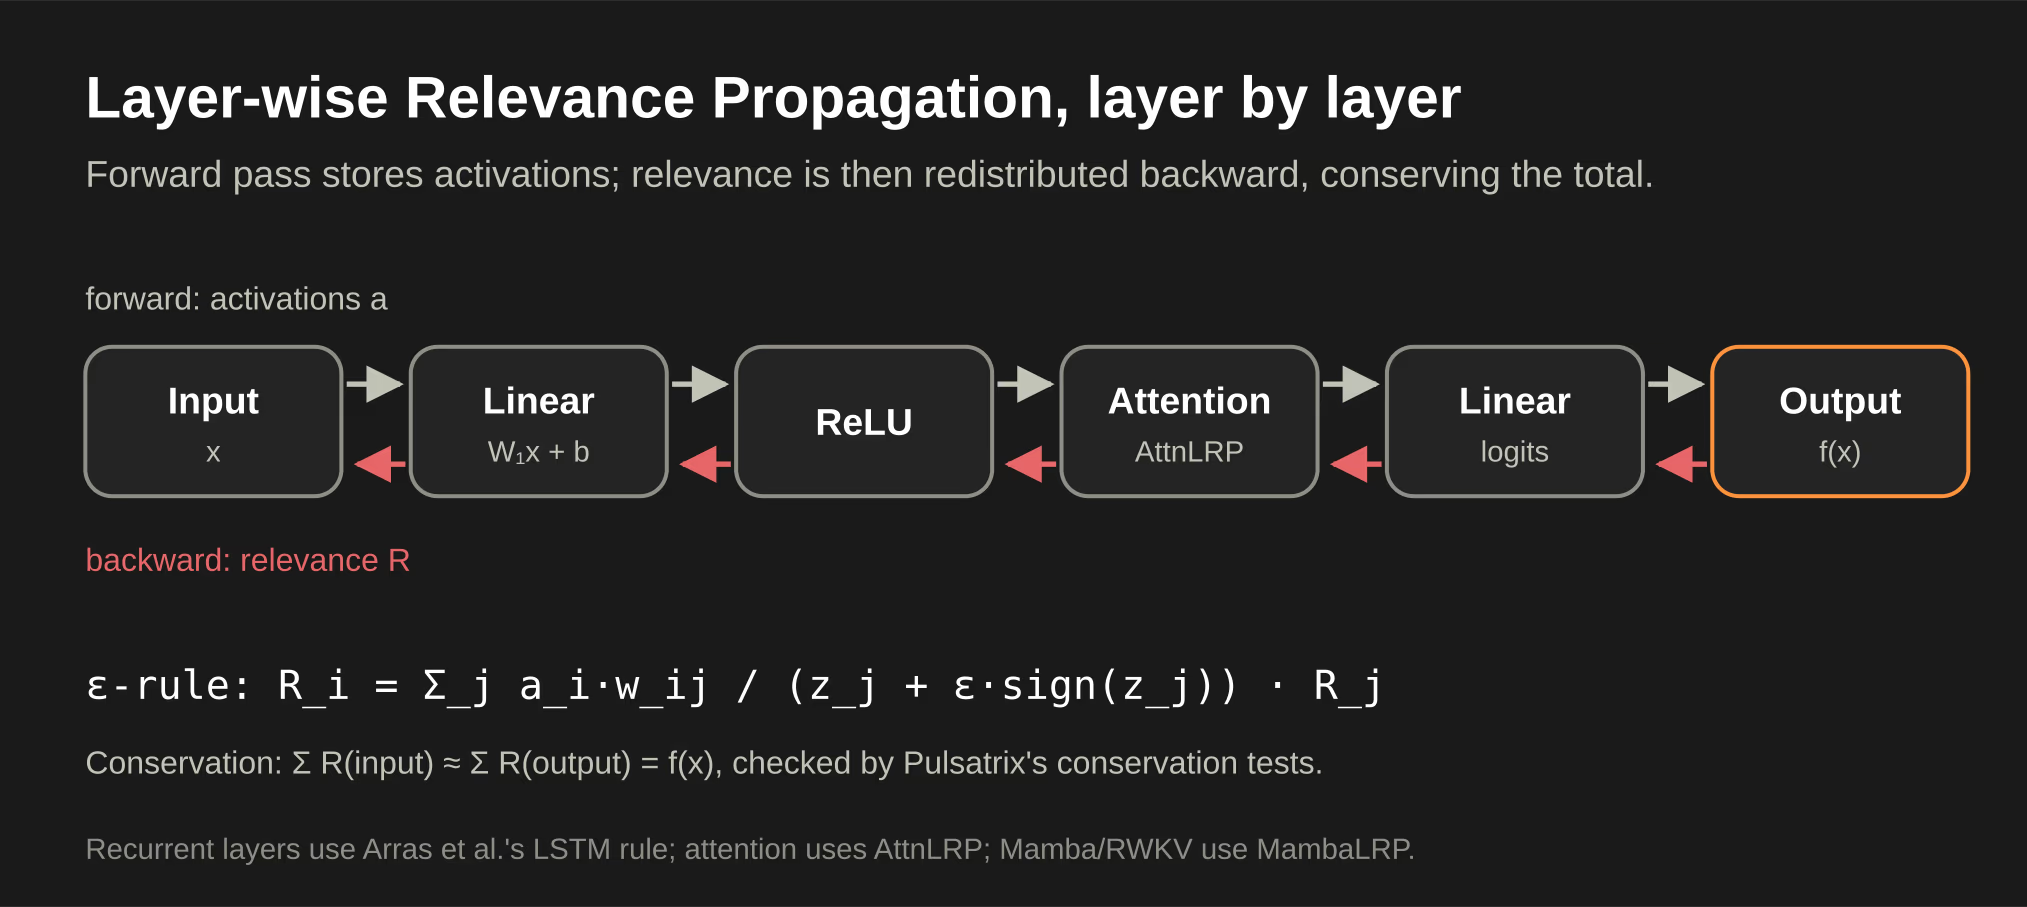
This is the part I'm proudest of. In Pulsatrix, every module has to implement propagate_relevance(). It's a pure virtual function on the Module base class, so a layer without Layer-wise Relevance Propagation literally won't compile. Linear and convolutional layers support the standard rules (ε, γ, α-β including z⁺, and the ZBox rule for pixel inputs), and you can mix them layer by layer using the same composite presets Zennit ships. Recurrent layers follow Arras et al.'s LSTM rules, attention and transformer blocks use AttnLRP, and Mamba uses MambaLRP. Where no published rule existed (RWKV, RetNet and some of the fuzzy-logic modules), I derived one in the same spirit. The rules are backed by tests that check relevance conservation, meaning the relevance flowing into a layer adds up to the relevance flowing out.
Explaining a whole model is a single call. LRP::explain() runs the forward pass, seeds relevance at the class you ask about (or at that class against another one), and walks it back to the input. It works the same from Python.
Here it is on a real TransformerBlock from the examples, showing the attention weights for both heads and the relevance assigned to each input feature:
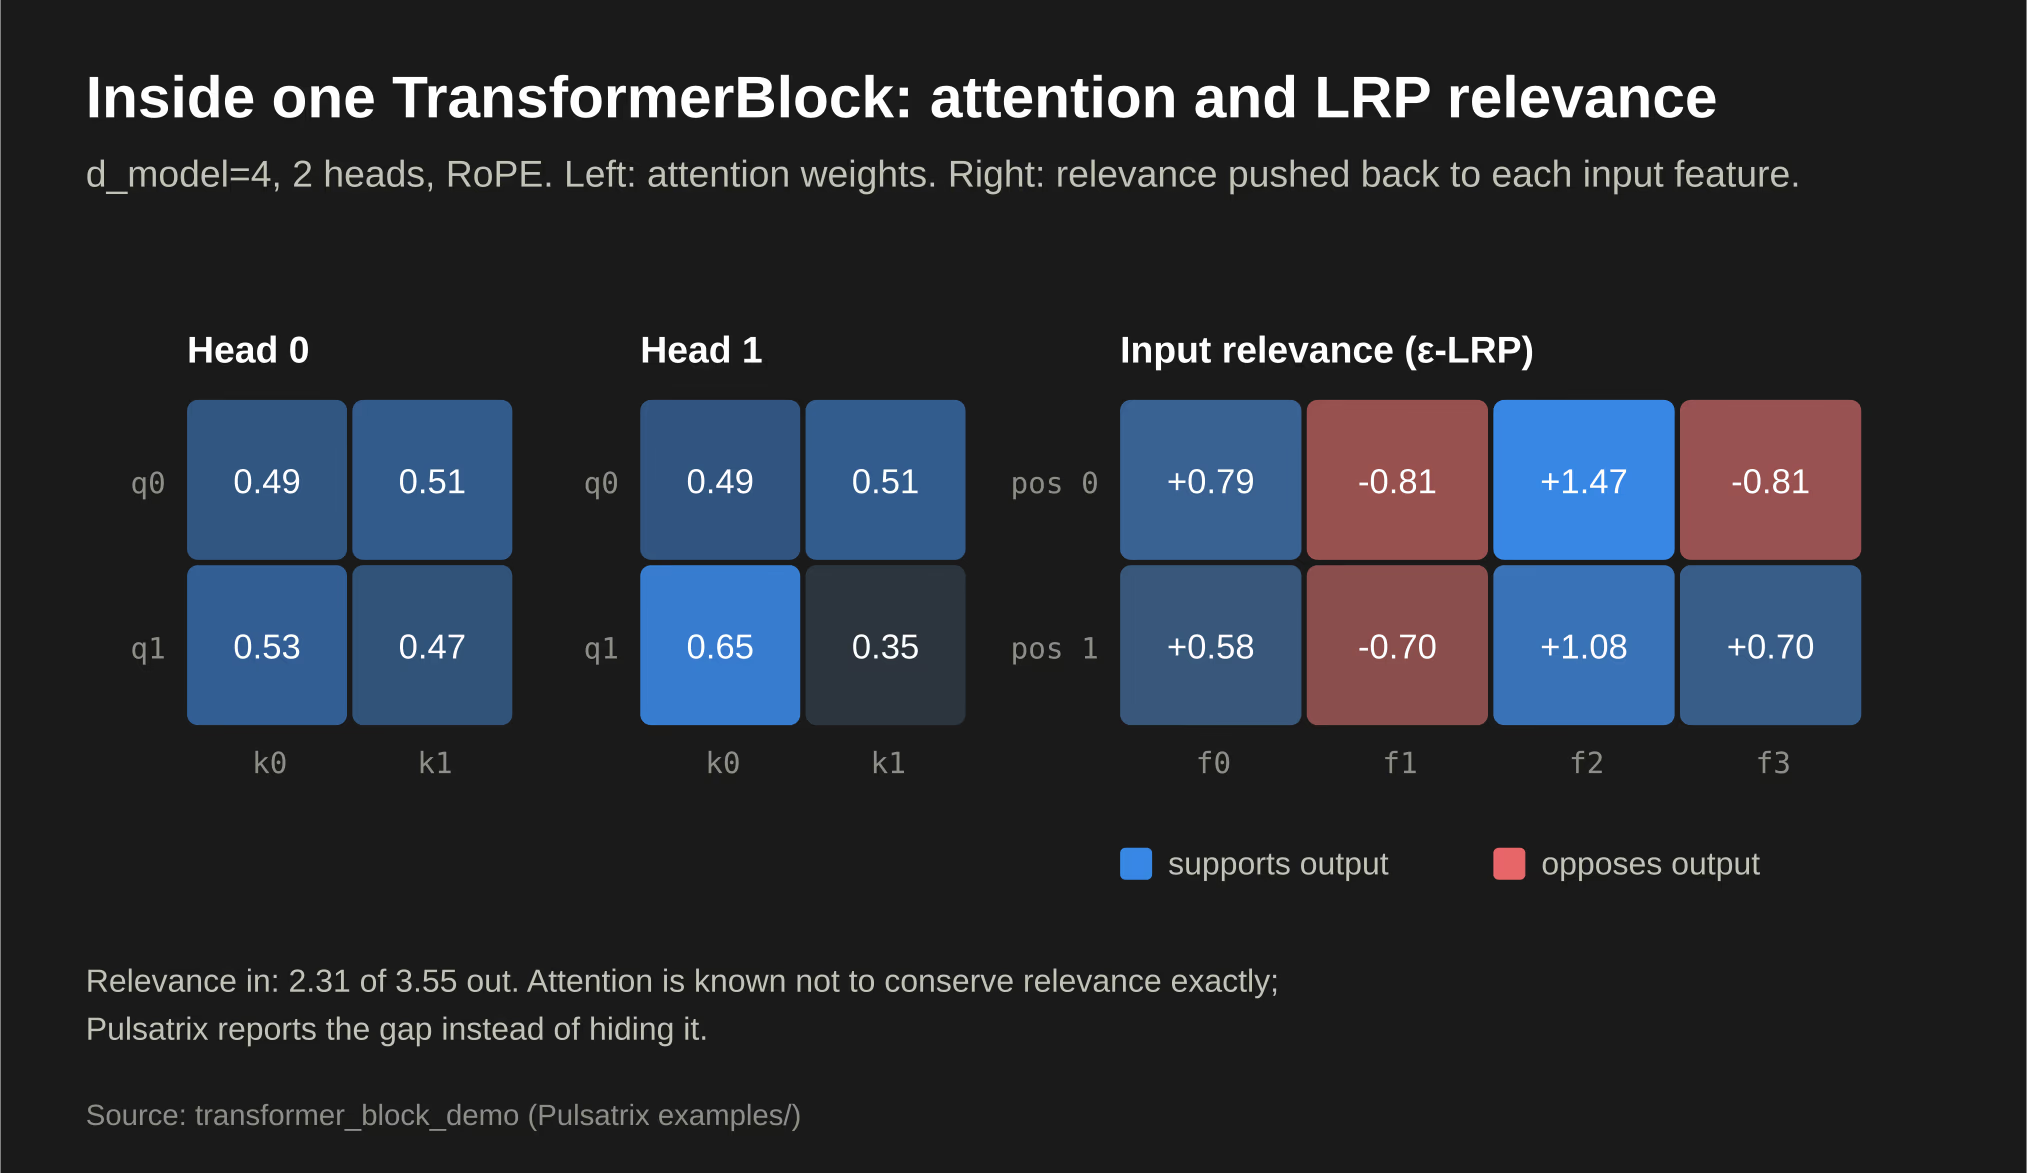
One thing I like here: attention is known not to conserve relevance perfectly, and instead of hiding that, the demo prints the gap.
Toy examples only go so far, so here is a real one. I trained a small CNN (Conv2D → ReLU → Linear) on 10,000 real MNIST digits. It took about 50 seconds on a CPU and reached 96% accuracy on held-out digits. Then I asked LRP why the network chose each answer. Each heatmap explains the predicted class against the average of the other nine, and the relevance on the pixels adds back up to the score being explained, to within about 6%. That remainder isn't noise, and I traced it: it's relevance sitting on convolution units in the blank background that are switched on by their bias alone, with no input pixels to pass it back to:
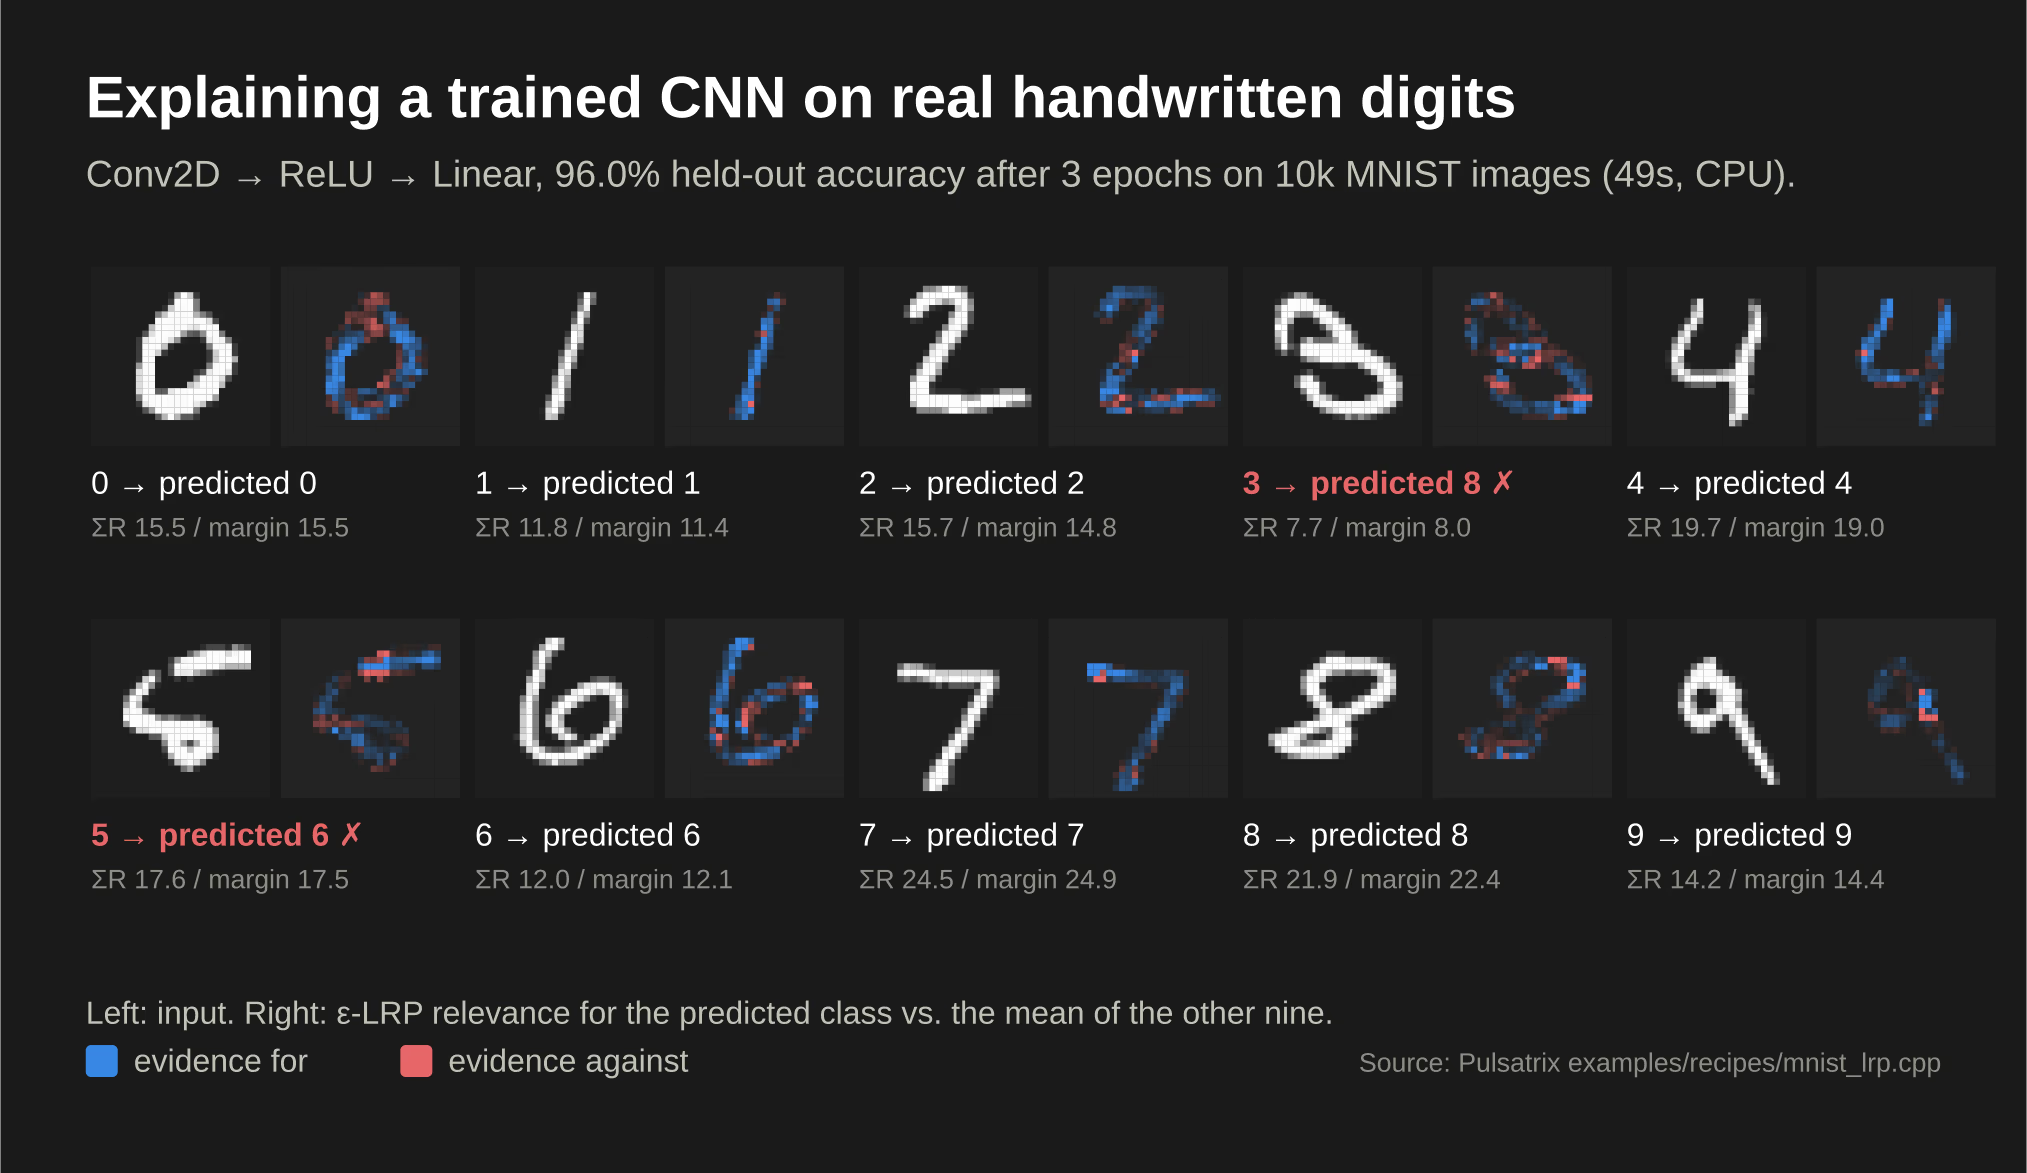
The two mistakes are the interesting ones. The 5 that the model calls a 6 was a confident mistake, with a margin of 17.5, about the same as the correct digits. Accuracy numbers would never show you that. The heatmap shows which strokes the network leaned on to reach the wrong answer, and that's exactly where you'd start debugging it.
You can reproduce this figure's numbers yourself with the mnist_lrp_recipe example. It trains the same model and prints the same scores and relevance sums.
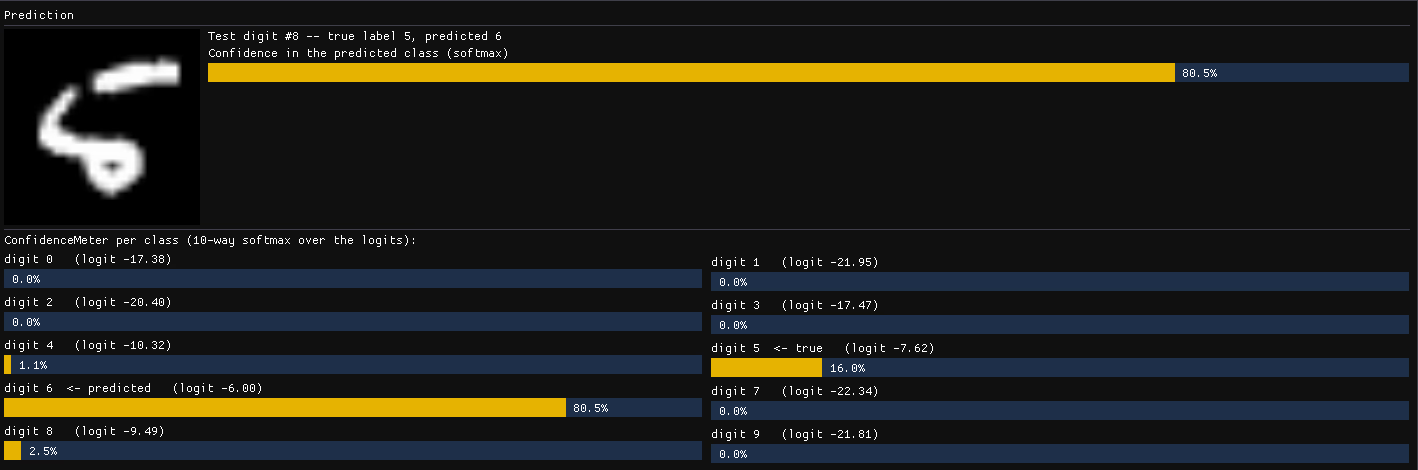
Pulsatrix's own visualizer tells the same story. In its MNIST gallery, a separately trained model that saw all 60,000 training digits makes the same mistake on the same digit (test digit #8). The confidence meter shows how sure it was: 80.5% that it's a 6, and only 16% for the true answer:
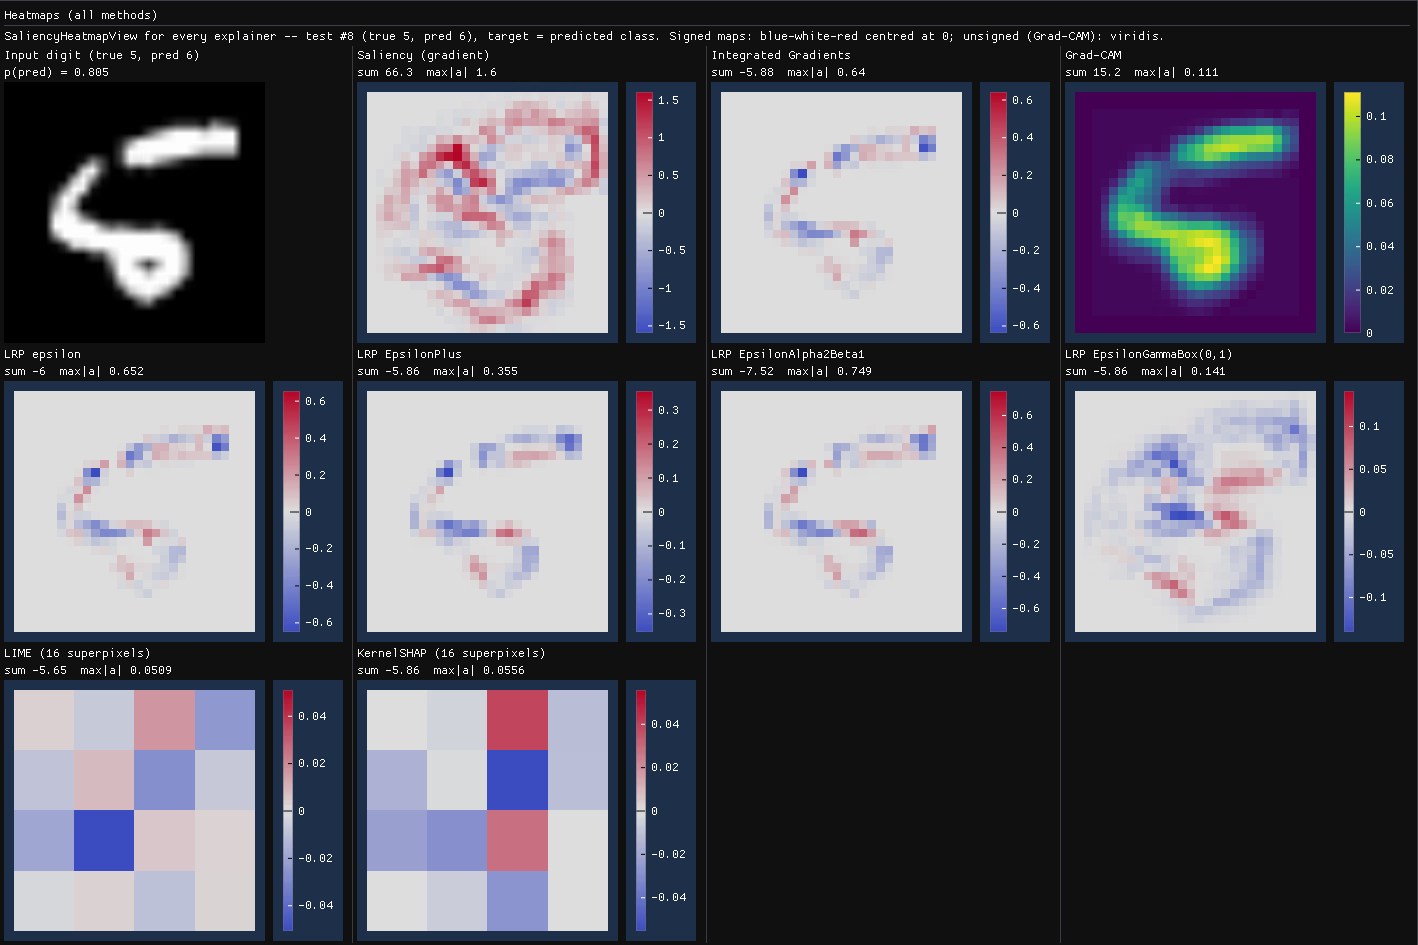
Every explainer in the library shares the same interface, so you can line them all up on that one mistake: plain gradients, Integrated Gradients, Grad-CAM, four LRP rule presets, LIME and KernelSHAP. In Pulsatrix's visualizer, red is positive attribution and blue is negative. Notice that the methods don't fully agree. That's normal, and it's exactly why you want more than one explainer before trusting a story about what a model did:
Post-hoc ExAI
For model-agnostic explanations there are KernelSHAP, LIME and Partial Dependence Plots, plus a tool for checking how stable an explanation is. For deep models there are Saliency, Integrated Gradients and Grad-CAM, whose results are checked against reference values generated with Captum, the PyTorch interpretability library.
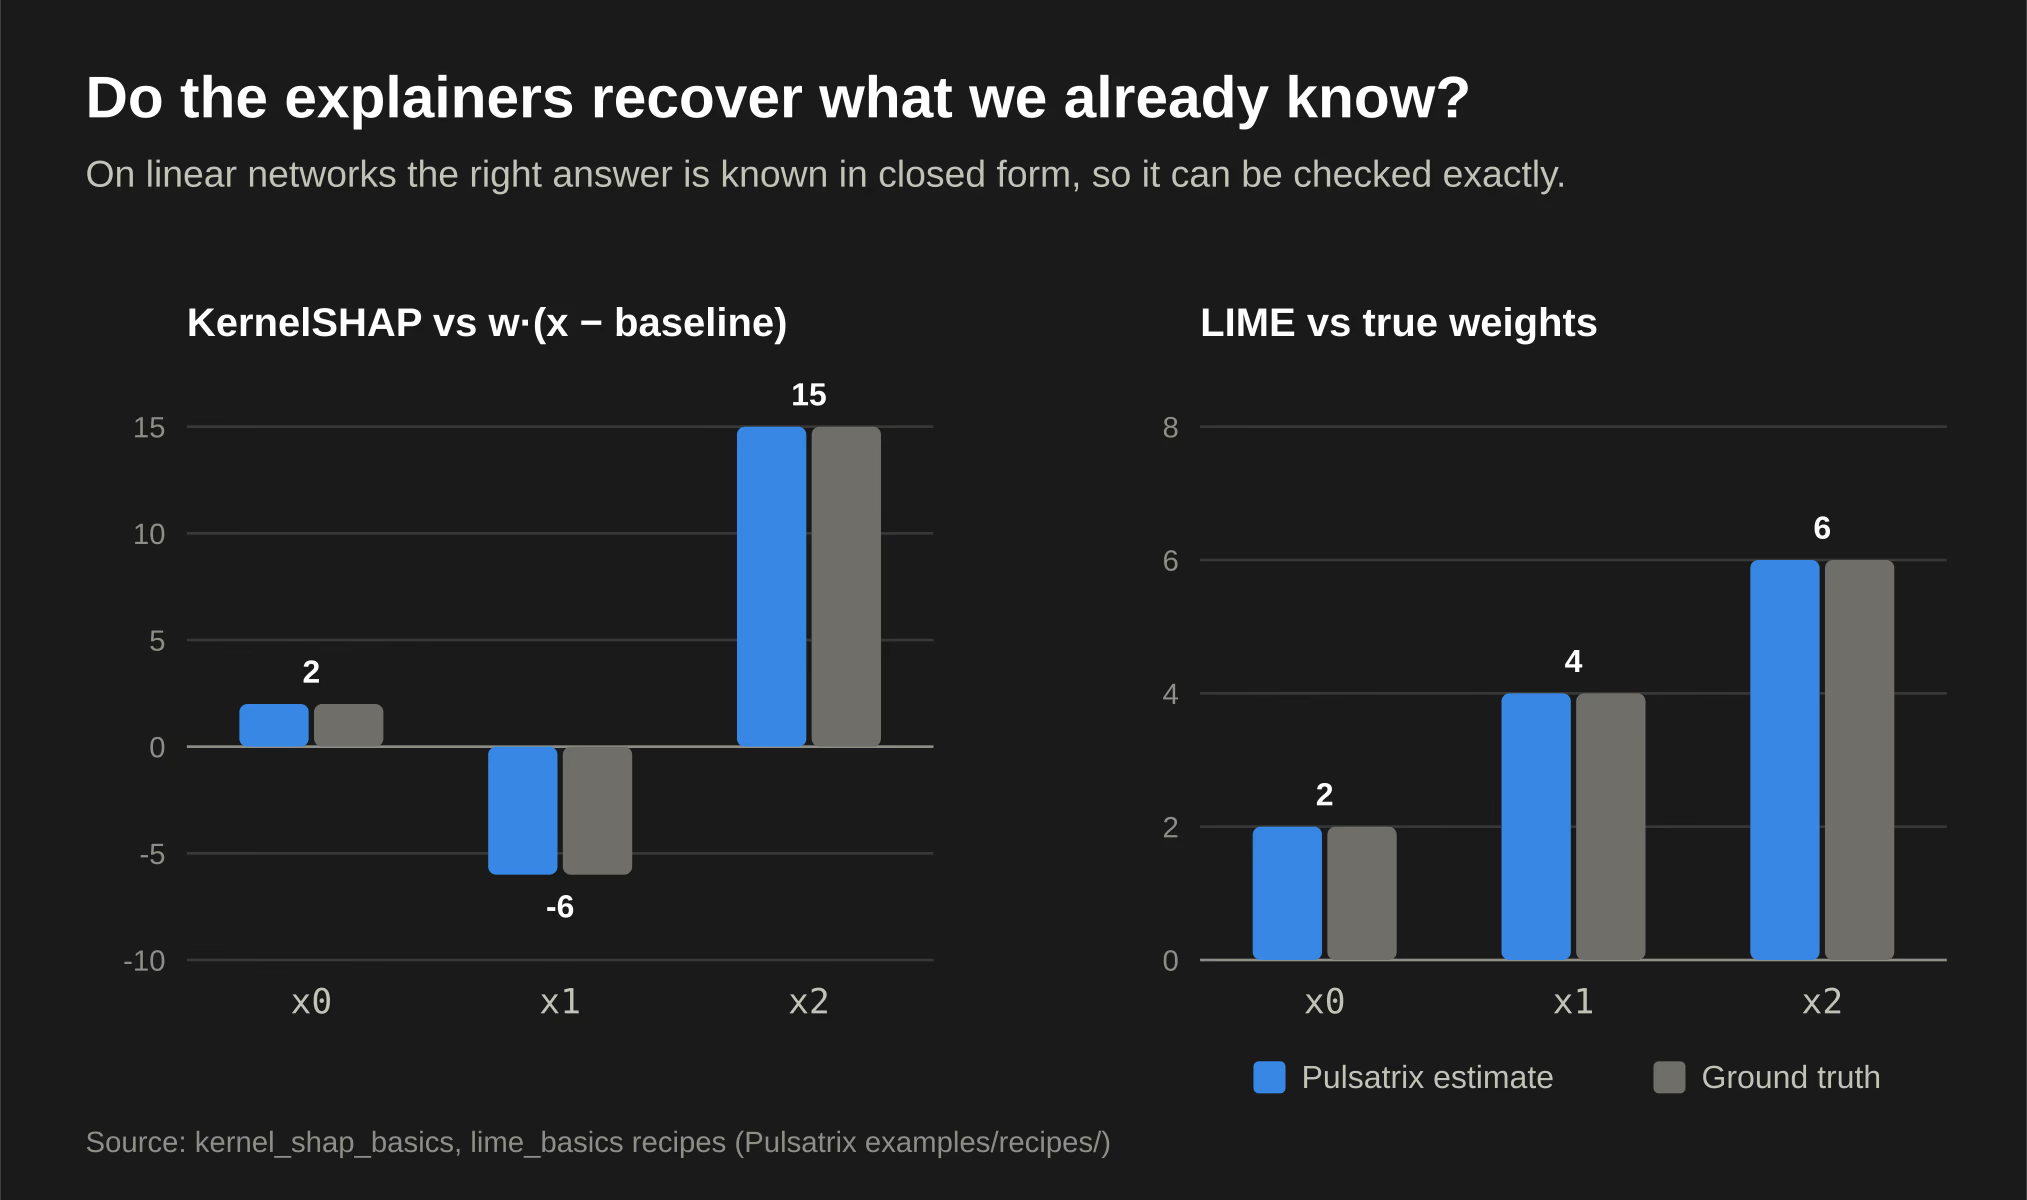
A good first test of any explainer is whether it recovers an answer we already know. On a linear network, the correct attributions can be written down by hand. It's only a sanity check, but if an explainer fails this one, nothing else it tells you matters:
Mechanistic interpretability
Post-hoc methods tell you what mattered. Mechanistic interpretability tries to tell you how the model computes it. Pulsatrix includes activation snapshots, activation patching, linear probes (with a negative-control test, so a probe can't "find" a concept that isn't there), sparse autoencoders, and a circuit graph for mapping how components connect. Automated circuit discovery is on the roadmap.
Reinforcement learning
The RL toolkit includes CartPole (discrete and continuous) and HyperGrid environments, replay and rollout buffers, GAE, and Polyak updates, along with these algorithms: DQN and Double DQN, REINFORCE, A2C, PPO and SAC. It also has GFlowNets with trajectory balance, sub-trajectory balance and detailed balance losses. Here are two of the agents learning CartPole from scratch. Each run takes about a second on a CPU:
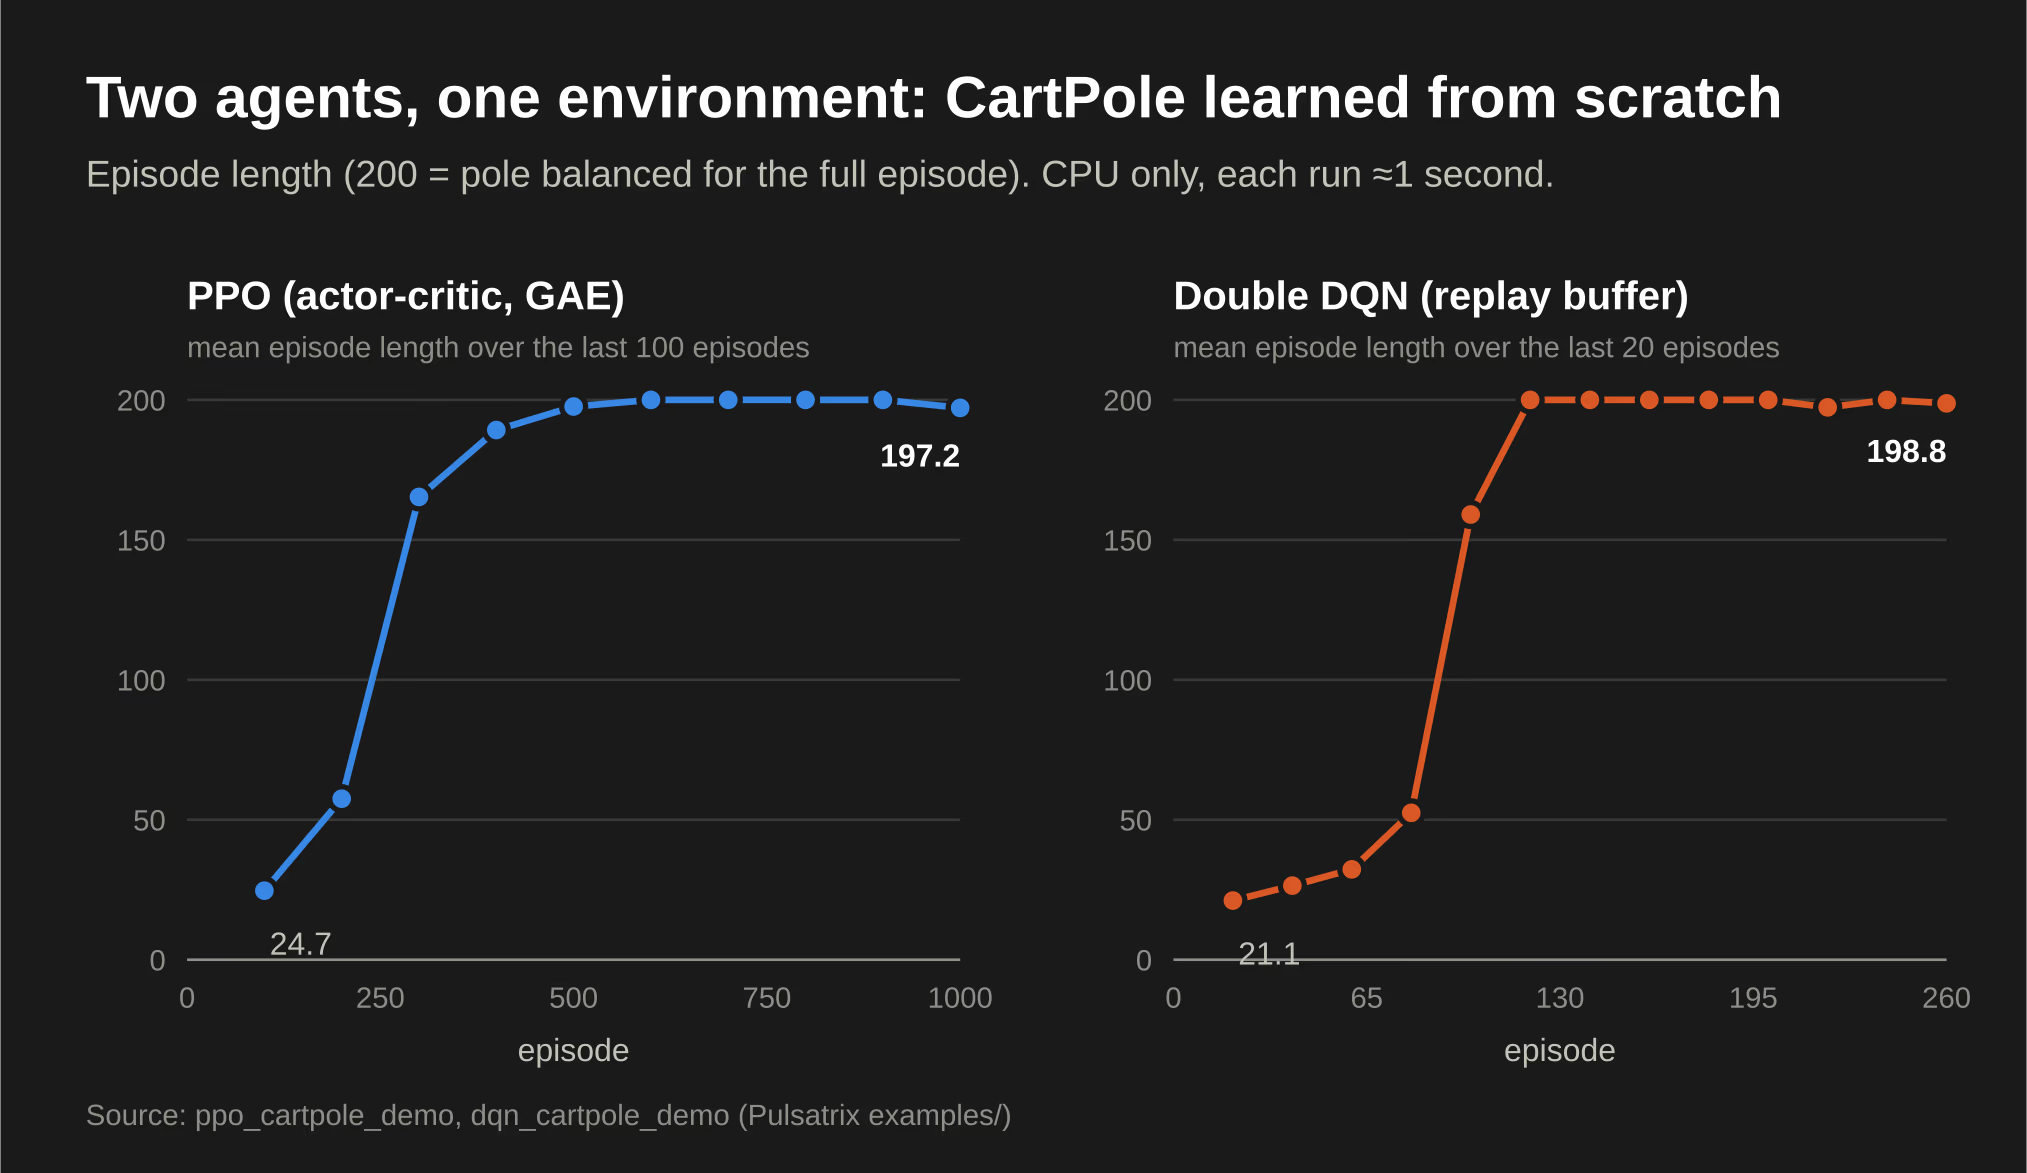
The DQN and policy-gradient agents take ordinary Pulsatrix modules as their networks, so the same LRP and attribution tools can be pointed at a Q-network or a policy. Explaining why an agent took an action is the next demo I want to build.
Neuro-symbolic
There are two pieces here. The first is a set of fuzzy-logic modules (Conjunction, Disjunction, Negation, Aggregator) with satisfaction losses, so you can train a network to respect logical rules. In the toy knowledge-base demo, a network learns to satisfy the rule A(x) → ¬B(x) and goes from 77% to 98% rule satisfaction.
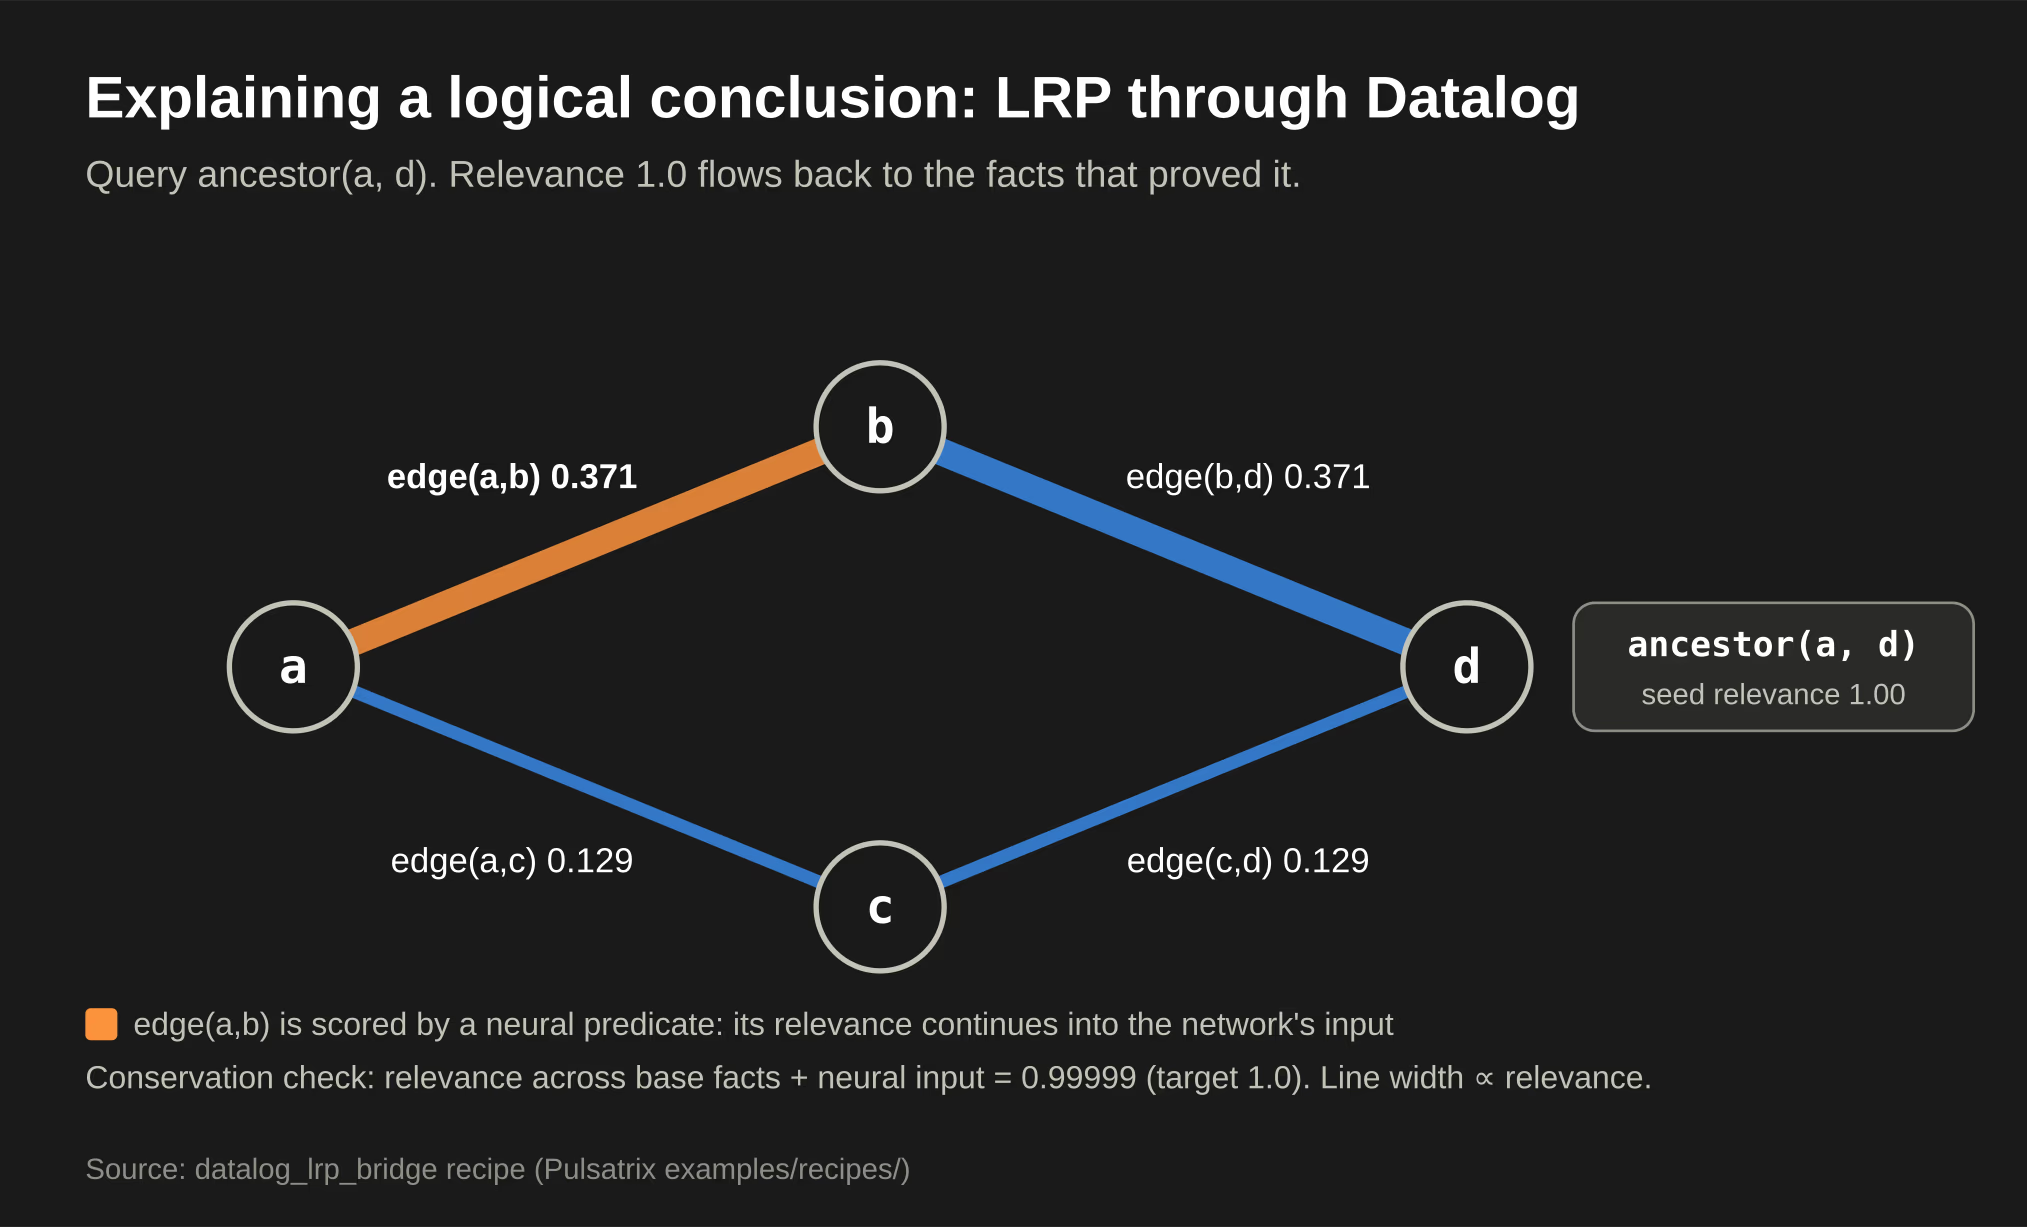
The second is a Datalog engine (naive and semi-naive evaluation, with weighted and semiring variants) that can be bridged to neural predicates. The cool part is that LRP runs through the logic too. Ask "why is a an ancestor of d?" and the relevance flows back through the proof to the facts that supported it, and through the neural predicate into the network's input:
Visualization
Pulsatrix ships native visualizations built with Dear ImGui and ImPlot: attribution bar, beeswarm and waterfall charts, saliency heatmaps, circuit-graph views, a confidence meter, explanation score cards, a dataset preview and a live training dashboard.
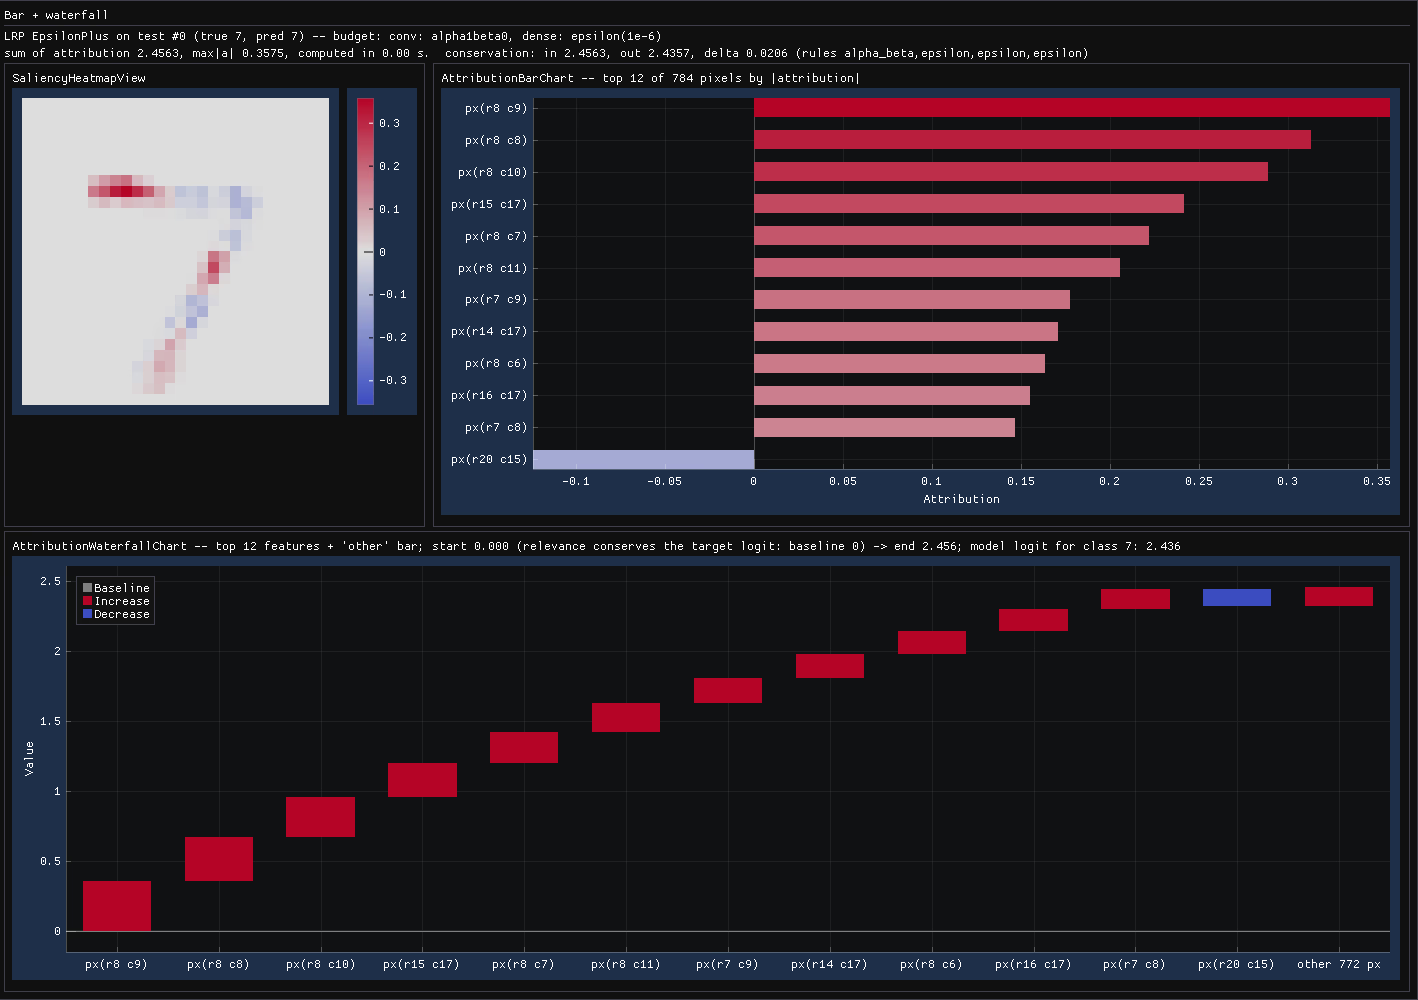
The screenshots in this post come straight from it. Here's one correctly classified 7 explained with the EpsilonPlus LRP preset. The bar chart ranks the most relevant pixels, and the waterfall stacks their relevance up to the score the model gave the digit:
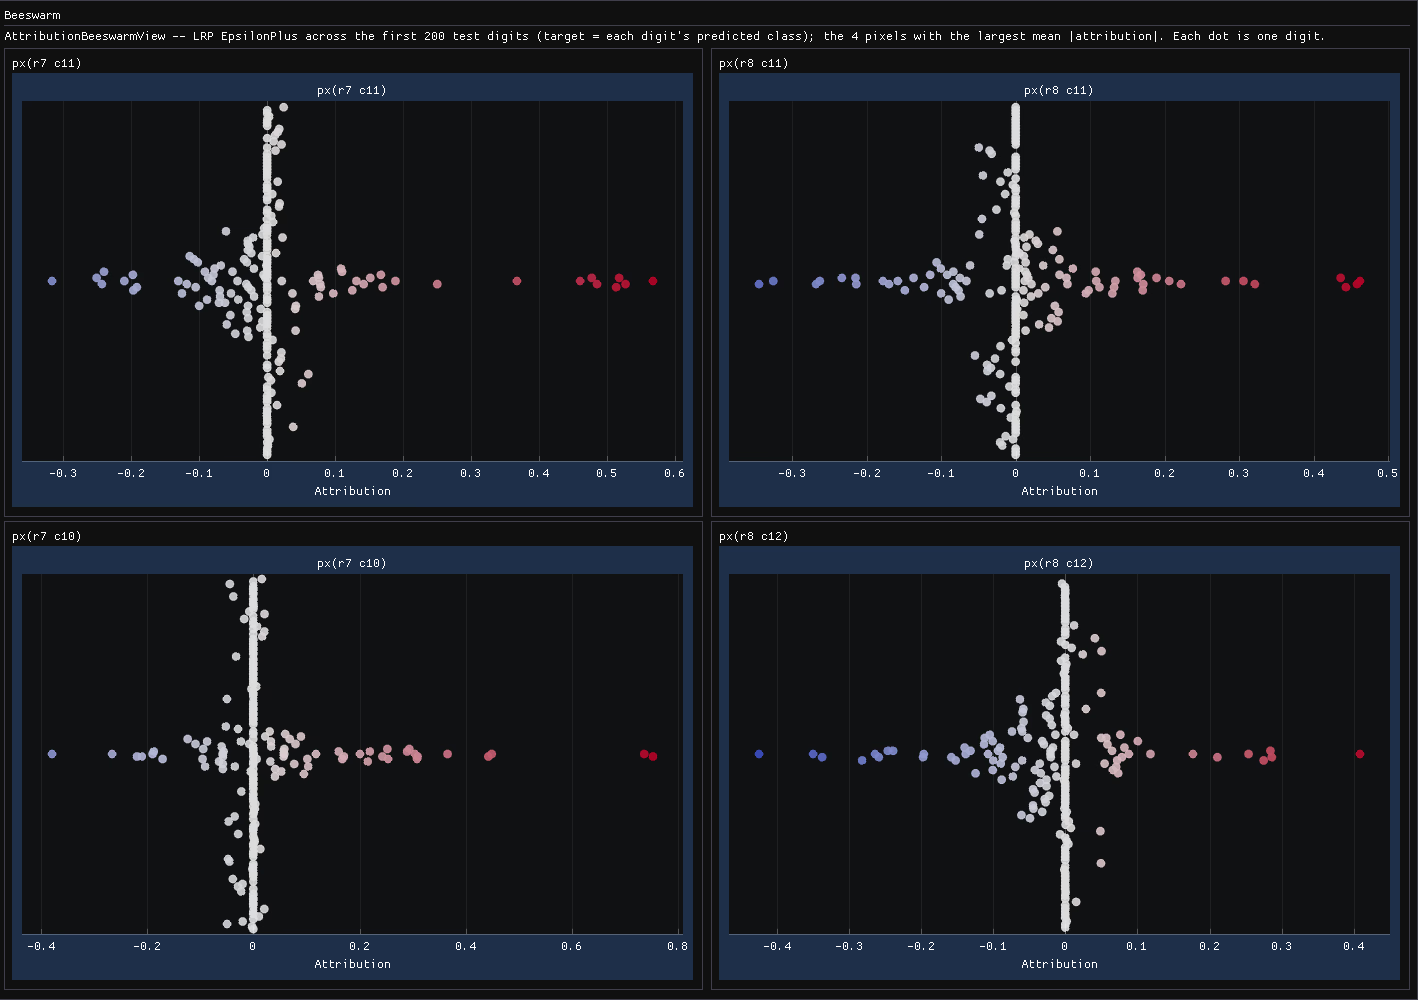
One explanation is one data point. The beeswarm view zooms out: it takes the four most important pixels across the first 200 test digits and plots one dot per digit, so you can see whether a pixel matters consistently or only now and then:
And a few extras
Along the way the library picked up evolutionary computation (genetic algorithms, NSGA-II, NEAT, evolution strategies, CMA-ES, population-based training), hyperparameter optimization (Gaussian-process Bayesian optimization, TPE, successive halving, Hyperband, ASHA) and Python bindings via pybind11.
How I checked the agent's work
"An agent wrote a deep learning library in two weeks" should make you skeptical. It made me skeptical. So nothing was accepted on the agent's word:
- Tests came first. Every task started with tests written against the spec, before any implementation. The suite now has close to 2,000 tests.
- The explainers are checked against outside references. Saliency, Integrated Gradients and Grad-CAM are compared against values generated with Captum, and KernelSHAP and LIME are checked against closed-form answers.
- LRP is checked against the reference libraries. Whole-model LRP matches Zennit on an MLP and a CNN across its rule presets, and LXT's AttnLRP on attention and transformer blocks, to within about 1e-5. The pinned environment and the script that generated the reference values are in the repo, so anyone can regenerate them.
- LRP is checked for conservation. Relevance has to add up across layers, and where it doesn't (attention), the gap is reported instead of hidden.
- The GPU has to agree with the CPU. Every module's forward pass, backward pass and LRP on the GPU is tested against the CPU on the same inputs. Whole training runs (an MLP, a CNN, recurrent and state-space models, and a DQN agent) have to end with the same weights on both.
- The demos have pass bars. The RL demos print PASS or FAIL against fixed improvement thresholds, and the linear-probe tests include a negative control.
None of that proves the library is bug-free. It does mean every claim in this post comes from a check you can run yourself.
Try it
You'll need CMake 3.20+ and a C++17 compiler. Google Test is downloaded during configuration.
git clone https://github.com/Joshuaweg/pulsatrix.git
cd pulsatrix
cmake -S . -B build -DCMAKE_BUILD_TYPE=Release
cmake --build build -j
./build/explainer_demo
./build/ppo_cartpole_demo
There are 17 demos and 13 recipes in examples/, each with a walkthrough in the documentation. Add -DPULSATRIX_ENABLE_VIZ=ON for the visualization demos, or -DPULSATRIX_ENABLE_CUDA=ON / -DPULSATRIX_ENABLE_HIP=ON for GPU builds.
Why ExAI-first
Even with AI assistance, this took a little over two weeks to finish. I can't imagine how long it would have taken on my own: about 350 commits, more than 300 source files and around 2,000 tests. And of course there is so much more that can be added to this project.
This library is ExAI-first because explainability should be the first thing considered when building these systems, and that is proving to be extremely important today. I've said this many times, but it bears repeating: "An answer without any auditable reasoning or explanation is no better than an educated guess." It can have some utility, sure, but that utility comes at the risk of letting an AI get away with taking shortcuts, using bad reasoning, and potentially marginalizing members and groups of society.
I invite all of you, even if you have never used C++ before, to clone this library, run the small examples, look at the attributions of your input features, and build an experiment. People have been saying that 2026 is the year of "Agents" or "Context." Let's see if, possibly with this library, we can make 2027 the year of Explainability... or the year of C++. Fingers crossed.